Share it! Science : technology
Showing posts with label technology. Show all posts

STEM Learning with Makeblock's mBot Ultimate 10-in-1 Coding Robot Kit

We have been enjoying playing with our new mBot Ultimate robot from Makeblock. I was fortunate to be asked to review this product, and the kids and adults in our house have had fun building and experimenting with our first build, the "Robotic Arm Tank" robot. 
 
Makeblock creates products for STEAM education that help people turn their "ideas into reality". The mBot Ultimate 10-in-1 coding robot kit will certainly inspire teens and families who love to build and engineer to explore robotics and coding in depth. Read on to find out what we liked best about this robot building kit.
 
STEM Makeblock Ultimate Coding Robot Kit
 
Please note: I was given this product free of charge and invited to honestly review this product and become an affiliate of Makeblock. I was not otherwise compensated to write this post. This post contains affiliate links, meaning I receive a commission from purchases made through these links, at no additional cost to you. Please see disclosures for more information.


Unboxing mBot Ultimate 10-in-1 Coding Robot

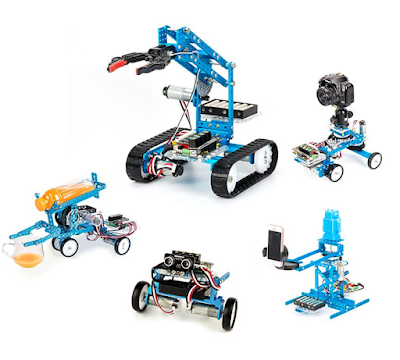
The mBot Ultimate comes with a ton of pieces and components to build 10 robots with different features. It's essentially a modern erector set with metal support pieces, motors, sensors and a circuit board. 
 
STEM Makeblock Ultimate 10-in-1 Coding Robot Kit


The box consists of 2 layers of pieces. The instruction booklet has a detailed listing of parts with illustrations. After building our first robot, I would highly recommend familiarizing yourself with all the parts prior to building. Some of the hardware is very well organized and labeled, while other parts are not. If I was going to use this in a classroom, after-school team or club setting I would be sure to either label the hardware in advance or dedicate time to allow students to identify which piece is which. 

STEM Makeblock Ultimate 10-in-1 Coding Robot Kit
 
The instruction manual has the directions for the Robotic Arm Tank, which is what we built, the Beverage Robot, and the Camera Dolly.  You can follow a link in the manual to directions for the other builds, however if you speak and read English you will have to translate the page to English with your web browser. In order to download further instructions you must create a free account on the site. After quite a bit of digging, we found easier access to the additional builds. You can find the instructions for the additional robots here in .pdf form. 
 
You can also find additional help and resources for the Ultimate 10-in-1 Coding Robot here.  

STEM Makeblock Ultimate 10-in-1 Coding Robot Kit


Building the mBot Ultimate Robot

This was not a quick build, but it resulted in a sturdy robot that my kids want to keep playing around with. I would highly recommend this kit for the teen who has a vested interest in engineering and robotics. Like any building project there is some trial and error especially when building with so many small parts. Patience and the willingness to make adjustments as you go is key! The mBot Ultimate would be perfect for an older child who has experience creating with LEGO, or building with tools. However, it would also be a great project for any age with help from an adult. 

Even my preschool and elementary school aged children enjoyed tinkering around with the pieces and built their own creations as we went. 
 
There are no special tools needed to assemble the robot. The one screwdriver needed is included in the kit. 

STEM Makeblock Ultimate 10-in-1 Coding Robot Kit

STEM Makeblock Ultimate 10-in-1 Coding Robot Kit


Coding and Playing with Makeblock's mBot Ultimate Robot

Once the robot was built, it was not difficult to get it up and running. There are many options for coding the mBot Ultimate robot. Beginners can use the mBlock app for simple block coding. For more advanced coding it is compatible with Arduino or Python coding combined with Raspberry Pi. 

We used an iPad to remote control our robot with the app available from Makeblock. Here is a peek into what the app looks like as you are using it to control the robot, and while you are coding. 

https://www.makeblock.com/?ref=UJWJzPw-bQClUh&utm_medium=5544&utm_source=influencer 
And here is our robot in action, helping us tidy up! 


Makeblock mBot Ultimate 10-in-1 Robot: Summary

Overall, we really enjoyed the process of building, coding and interacting with our Makeblock mBot Ultimate robot kit. I would recommend it based on the quality of the parts, the versatility of the components and the ability to build 10 different projects with one kit. I liked that the compatibility of the robotic components with various coding apps and languages, such as Arduino, Python and components compatible with Raspberry Pi, gives basic coding options for beginners, and gives experts the opportunity to try something new. 
 
The robot kit is STEM through and through with a good combination of each STEM discipline: technology through coding, science and technology through the use of sensors, math in the measurements and sizes of components, the engineering process through building, testing, trial and error.
makeblock STEM robotics


The kit comes at a higher price point, but for the right kid or family the mBot Ultimate would be a great investment as there is a lot of play and learning value here. There are also many other robots and products available from Makeblock in a range of prices that would meet the need of different budgets, ages and learning goals. 

Use code: SAVE10 for $10 off your first purchase!

Teachers can join Makeblock's discount program and purchase kits for their classroom. Learn more here.


Would we recommend Makeblock's mBot Ultimate 10-in-1 Robot Kit? Definitely. We are already thinking of what we might be able to do with our next mBot Ultimate build. Check out Makeblock! I think you and your favorite little (or big!) engineer will be glad that you did.

STEAM Opportunity: Kid Vid Fest Stop Motion Film Festival

I'm really excited to share this fun STEAM opportunity for kids: create a stop motion video for the Kid Vid Fest movie festival!

This is a great way to keep your children busy during the last bit of summer. Enter the Kid Vid Fest Stop Motion Contest! What is stop motion? It is a type of animation using a technique where the camera is frequently stopped and started giving motionless figures movement. Kids can create this type of animation with clay, LEGO bricks, or other toys.

This post contains affiliate links, please see disclosures for more information. 

The beauty of the digital age is that just about everyone has a device that can film or take photos in their back pocket. There are many ways to create a stop motion film. You can find lots of descriptions for how to create your film on the Kid Vid Fest website.

http://www.kidvidfest.com/

Kid Vid Fest was created to cultivate kindness and creativity online. This online film festival celebrates the positive imaginations of youth! It is a great opportunity for your students at school, children at home, afterschool STEAM club participants, or makerspace kids to create a new masterpiece.

You can find everything you need to know to enter the contest here. Hurry! The Early Bird Deadline (free entry) is August 15th. You might even win a Chromebook or another great prize!

The film festival sports a youth-led review board offering the opportunity for kids and teens to celebrate each other’s creativity. In honoring the Kid Vid Fest mission, this year’s inaugural festival focuses on the theme of kindness. We can’t wait to see how youth across the United States and the World interpret the theme and what stories the prompt generates. Join us as we partner with the Kid Vid Fest to Keep It Kind Online!

If you are interested in creating other types of animation, you will want to check out our post "DIY Zoetrope Animation STEAM Project".


http://www.kidvidfest.com/

Integrating Technology in the Life Sciences

The life sciences have always been my favorite, as I think they are for many due to our innate affinity for other living things. As many schools turn to more of a STEM (Science, Technology, Engineering, Math) focus rather than general science, we will need to adapt and improve our curriculum.

If you are a biology or other life science teacher, and are struggling to find ways to integrate different types of technology into your science curriculum, then you've come to the right place! In this post I'll explore some ways that technology can easily be incorporated into more traditional learning activities in the life sciences. I've organized the ideas by topic, and you'll find opportunities across different age groups in these sections.
How to Integrate Technology into Existing Science Curriculum

This post contains affiliate links, meaning I will receive a small commission (at no additional cost to you) if you make a purchase after clicking a product link. Please see disclosures page for more details.

Create a Digital Comic

Have students create digital comic strips with free Comic Life software to model biological processes such as meiosis and mitosis, or for the younger crew, life cycles such as metamorphosis. If you want a lower tech version, or an opportunity for students to map our their ideas on paper first, grab this paper template.

3-D Cell Models

Learning about animal and plant cells and the organelles that make up each is a standard unit in any biology course and even in many elementary and middle school classrooms. Students are asked to draw or create models of cells. Often these are made from candy. Rather than go the sugary route a colleague of mine has his students design a digital model that is then created in 3-dimensions using a 3-D printer.

Digital Cell Model Design 

Students evaluate their peer's designs for accuracy, proportions and proper inclusion of organelles. Like any modeling process, the students develop a deep understanding of the parts of the cell by having to recreate them, but this method also employs design and technology.

Student's 3-D Printed Cell Models

Although not everyone has access to a 3-D printer, there are makerspaces popping up all over the place where you can use one. Use this makerspace directory to find one near you. 3-D printers are also becoming more accessible and affordable. This popular mini printer is just under $200 and this da Vinci mini printer is under $300.


Digital Microscopes

Digital microscopes can be awesome tools to use to share magnified images of something minuscule with a large group via projector, or to save images of your micro-discoveries.

The reasonably priced, Zoomy handheld digital microscope is a great choice for kids, making it easier to get close up to whatever you're interested in. These microscopes plug into a computer via USB to download and magnify images.

http://www.pjatr.com/t/TUJGRU5LRkJGSkdLTkxCRklGRUhK?url=https%3A%2F%2Fwww.learningresources.com%2Fproduct%2Fzoomy--8482-%2Bhandheld%2Bdigital%2Bmicroscope.do%3Fsortby%3DbestSellers%26refType%3D%26from%3DSearch%26ecList%3D6%26ecCategory%3D


Another useful digital microscope option is this inexpensive adapter that turns your smartphone into a digital microscope. A great tool for outdoor science lessons.


Biology Games and Simulations

There are many computer games and simulations that can embellish upon biology concepts.


Learn the functions of the different cell parts by playing CellCraft, a free game from Carolina Biological. In the game you'll travel into the cell to learn about the different organelles, and important molecules such as glucose and ATP all the while trying to keep the cell alive in a harsh environment.

Although in many ways they cannot replace the experience of a real dissection, there are now many options for virtual dissections. These are not only beneficial for economic and ethical reasons, but can also add an element of technology to a lesson. Investigate the traditional frog dissection virtually with this simulation from McGraw Hill Education. You'll find a college level virtual fetal pig dissection here and a long list of other virtual dissection opportunities here.

You'll find a slew of biology simulations from gene expression to natural selection at PhET simulations. My middle school students always enjoyed playing games on the National Science Foundation's Edheads site. You'll find a free DNA game here and a hip surgery simulation game here.

Turn Life Science Biology into STEM Curriculum

Digital Media and Simulations for Genetics 


Investigate this Smithsonian site from the exhibit Unlocking Life's Code that explores genomics. You'll find a talking glossary of genetic terms, and a huge media library of images, animations, videos and apps.

You'll find boatloads of digital resources for learning genetics here.  Use StarGenetics, a program developed by MIT faculty to virtually combine genetics of various organisms, such as cows, fish, flies, peas and even different smiley faces, virtually, to better understand traits. With the Classical Genetics Simulator, students can explore Mendelian genetics by simulating multiple generations of organisms without waiting weeks, months or years to see the resulting traits.

Tech for Studying Plants


Growing plants and learning about their needs is an activity that stretches across all age groups. You can collect data while plants grow by determining the type of light they are receiving with a light meter, monitoring the moisture of the soil with a low-tech moisture meter, or testing the soil pH with a pH meter.


If you have an ed-tech budget, you might be interested in purchasing a data logger. These are great tools that measure conditions like humidity, light or temperature over time that can then be downloaded and analyzed. Pop a data logger into a terrarium or other type of ecosystem model, measure conditions over time and compare your data to plant growth.

I visited a classroom that was using Aerogarden systems to study plants. These "smart" plant systems grow plants through advanced hydroponics. Although it doesn't teach in the same way as having a student become responsible for growing a plant themselves, in the right scenario something like this would be excellent for controlling experimental conditions.

If you're learning to identify plants outdoors, you might want to check out some of these free apps that serve as digital field guides. Although I love a traditional book version of a field guide, the benefit of using these is that several have options for submitting photos for identification or comparison, which can be a handy tool for young learners.

Explore plant identification and seasonal growth data through the citizen science project: Project BudBurst. There are tons of opportunities for learning here and lots of resources for educators.

http://www.shareitscience.com/2015/04/project-budburst-easy-authentic-plant.html

Studying Wildlife


From adaptations to animal behavior, there is so much that can be learned by studying wildlife. However, it can be difficult to observe real animals in the classroom, aside from those that live in terrariums and aquariums.

One excellent way to bring animals into the classroom is by observing a wildlife camera. Learn more about the Raptor Resource Project's Bald Eagle camera here. You'll also find some excellent animal cams on the National Zoo's website.


Observe the tracks and sign of animals at home or in the school yard and then set up a wildlife cam to catch them in action. We have been snapping photos of birds with ours for years and absolutely love it. 

Study data like a wildlife biologist by observing and analyzing real animal migration data maps.  You'll find some excellent digital wildlife and nature maps to explore on this list from the National Wildlife Federation.

Students can participate in online citizen science projects like Penguin Watch and many others through Zooniverse.

http://littlebinsforlittlehands.com/stem-resources-guide-understanding-stem/

STEM Guide for Teachers


You've probably noticed that STEM and STEAM are really buzzy terms in the field of education these days. If you are new to the teaching field, or even a veteran ready to liven up your lessons, then this is a great time to leap into STEM. However, as an already very busy teacher, it can be daunting to change up your curriculum.

This post contains affiliate links, see disclosures for more information. 

The good news is, if you are teaching in a minds-on, hands-on way, you are most likely already incorporating STEM into your teaching. Here is everything you need to know about why you should be teaching STEM lessons, what it means exactly, and how to get started.

What is STEM?

STEM is an acronym representing curriculum that integrates the disciplines of Science, Technology, Engineering and Math. STEAM is becoming popular as well, which adds Art to the mix. This is becoming more prevalent and accessible as the benefits of adding Art and creativity to lessons are better researched and documented. You might even begin to see the acronym STREAM which also advocates for the integration of writing.
 
image: US Army CERDEC

What are the Benefits?

The benefits of STEM education are plentiful. STEM problem solving better models real-world problem solving. The subjects we learn in school are often partitioned off into distinct sections, but rarely is this the case in real life. Integrating subjects helps build skills students will use throughout their lives.

It empowers and inspires students to want to pursue jobs in STEM fields, a growing need in our country. STEM also encourages innovation and creativity as engineering challenges and science experiments require new ideas and support the process of trial and error. Not to mention that STEM is fun! These disciplines often get piled into the "too hard", or "only for nerds" category. Once students get to actually experience an engineering challenge, explore robotics or design their own experiment they find that those stereotypes are not true.

What Does STEM Look Like in the Classroom?

For a lesson to be STEM it should incorporate at least 2 of the STEM disciplines, and might use more. Here are some examples of STEM activities across all K-12 age groups.

Early Childhood (Preschool-Kindergarten)


Students are presented with an engineering task, i.e. "How can we move this ball across the field without carrying it or kicking it?" Students are given supplies like gutters, tubes, ramps, blocks, string etc. They work together and through trial and error find a method of transporting the ball to its destination.

Through the process, they learn (although may not be able to name) the ideas of gravity, forces and motion, design and engineering.

Elementary School (1st-4th Grade)


Students are presented with the question: What does a plant need to grow? They design an experiment where seeds are grown under different conditions, light/no light, water/no water, etc. The plants are measured and heights are graphed. Further experimentation comes from designing a "plant maze" out of a cardboard box to see if it will grow through the maze to follow the light.

To add a fun technology element they track the amount of light the plant receives and the water in the soil by using a light meter and a moisture meter. Then they graph these results and analyze the data.

Through the process they learn about plant biology, abiotic factors like light and water, phototropism, design and engineering, data collection, measurement, graphing and scientific tool use.


Middle School (5th-8th Grade)


Students are presented with the task of designing and building a solar oven. They must first draw a blueprint that maps out design, materials and where heat energy transfer (conduction, convection, radiation) takes place. Then they build, test and modify their designs. They monitor and record the temperature using a thermometer, or digital infrared thermometer. Temperature data is collected and graphed based on time of day.


Through the process they learn about solar energy, heat energy transfer, design and engineering, research and development, data collection, graphing and proper use of scientific tools.

High School (9th-12th Grade)


Students are presented with the classic egg drop design challenge. They are required to build a device that will safely transport an egg dropped from a high location. Not only do they work through the process of design and engineering, but they also must complete some physics computations. Scales are provided for measuring mass. Video is shot of the drops and manipulated to further understand ideas like acceleration and velocity. Motion sensors may also be used to collect data. Data is graphed to understand the physics behind the project.


Through the process students learn the design and engineering process, collect data and calculate the physics of motion including, velocity, mass and acceleration, graph data and learn proper use of science tools and technology.

STEM Resources and Inspiration

Where can you go for help with STEM curriculum? I'm a huge advocate for joining the National Science Teacher's Association (NSTA) for some of the best resources. Members have access to a community of knowledgeable practitioners, many professional development opportunities, and discounts on books.

Each year NSTA holds a STEM Forum and Expo. I have not had the pleasure to attend, but expect that the forum measures up to their excellent conferences, which I have attended. You don't have to be a member or attend a conference to benefit from great resources though, their books can also be purchased right on Amazon.

To liven up your middle school lessons, check out Doing Good Science in Middle School: A Practical STEM Guide For an excellent guide to research projects explore the STEM Student Research Handbook. For a resource that is geared for 3rd-8th grade students, check out STEM Lesson Essentials. Finally, if you teach Pre-K through 5th grade, look into Bringing STEM to the Elementary Classroom.  


Check out these additional professional development and activity resources:


Don't miss the rest of the posts in this STEM series on Little Bins for Little Hands:
The Best STEM Resources: An A-Z Guide to Understanding STEM

http://littlebinsforlittlehands.com/stem-resources-guide-understanding-stem/

Planning your school's science night? Make it a Family STEAM Night!


Providing Meaningful Experiences with Technology: An Interview with Eduporium CEO, Rick Fredkin


I was so pleased to review and share the Eduporium website with you last week. This week we are featuring an interview with Eduporium CEO, Rick Fredkin. We are impressed with his passion and vision for educating kids and being sure that students have access to meaningful experiences with technology.

Check out the end of this post for another great giveaway- a Tech Will Save Us DIY Speaker Kit and a $50 store credit to Eduporium. Giveaway runs from December 8th - Midnight (EST) December 14th, 2016. You'll also find an exclusive Eduporium coupon code at the bottom of the post.

An Interview with Eduporium CEO, Rick Fredkin


Is there a particular event, or experience in your life that inspired you to start Eduporium?
Having access to computers and technology was what gave me a career, so I truly believe giving young people access to resources where they can gain experience is fantastic.

Eduporium is a great resource for schools and those interested in educational technology. What is the most important or fulfilling element of running this business?
What’s important is that we get to provide innovative technology to teachers and students. We get to help students and the people who educate them. It’s a win/win/win: we are able to be in business and do good at the same time.

What do you think is the biggest stumbling block for introducing technology and STEM into schools? How does Eduporium work to alleviate some of these challenges?
I would say there are two main challenges. First is awareness, and second is the buy-in from educators. Students want to use technology, so for them this is all pretty easy. But the people who educate them have to know what exists out on the marketplace, what can be used in their classrooms, and they have to have the buy-in: they have to be shown that it’s something that’s attainable for them, and something they can use to teach what they’ve been teaching already.

We have many readers who are teachers, homeschoolers and informal educators. In fact, I was homeschooled for several years myself. I understand that you have an interesting educational background that includes Montessori, homeschooling and what I think most people would call “unschooling,” or practical life experience, these days. How did these experiences impact your interest in ed-tech?
I do have an interesting educational background. I attended Montessori schools for preschool up to kindergarten, and then attended a number of schools, both public and private, up to 8th grade. In which case, maybe I did homeschooling or “unschooling.” At the beginning of 9th grade, at the age of 12 or 13, I started professionally as a computer programmer at a full-time job, and continued working in that capacity in the computer industry ever since. That’s about 20-something years now. These experiences impacted my interest in edtech because it was my ability and access to technology in my younger years which led me to have my first summer job in the industry, and from there I learned. I want all other young people to have the same opportunities.

I think that Eduporium’s “Tech Lending Library” is a brilliant idea. What inspired this? How have schools and teachers responded to this service?
You mean “who,” and that would be one of my partners, Dr. Irina Tuuli. She is constantly talking to educators and thinking about what is best for them. Of course, a lot of the technology we’re working with is brand new, so the Tech Lending library is crucial: we need teachers, educators, and schools to understand how this new tech can be brought into the education market. So, let’s lend it to them! Doing that will make it that much easier for them to get their heads around bringing it into their schools.


There are a lot of great project ideas and instructions on Eduporium. Do you consider yourself a maker? If so, what is your favorite project?
I do consider myself a maker, yes. We don’t just have these products in the office: I have them all over my house. I use them with my kids. I make things, I break things, sometimes things don’t work, sometimes they do. My wife can sometimes get upset with me because various things around the house are in sort of “maker status,” like how we watch our TV, or the phones in our house. If I break them, they don’t work unless I fix them, which can sometimes take a while. So, yes, I’m a maker. I love to make things, I love to learn about new things, and all of the products that we sell we use – as adults!
I wouldn’t say I have a singular favorite project, per se. My type of favorite project is the kind that really shows the capability of all this technology. Say you have something like a Raspberry Pi: there are a multitude of interesting projects that you can do with it. But when you pair it with other technology, the number of things you can do with it multiplies exponentially. There’s an endless amount of possibilities.

If you had to make a prediction, what is going to be the biggest game-changer in educational technology in 2017? Is it a particular product, or method of teaching, etc.?
I’ve always been a fan of Project-Based Learning, so I think it’s great that it’s really coming to the fore and that people are paying attention to it and bringing it into schools. I mean, STEM education is great, but here at Eduporium we believe that it needs to be more than that. It’s not just technology for the purpose of teaching technology: it’s using the technology as a teaching tool and learning the same things that were going to be taught anyway, but to also have more relevant and engaging types of lessons that are more attuned to our modern world.

Thanks, Rick for allowing me and my readers to know you and Eduporium a bit better!

The Eduporium shop provides a space to purchase kits, maker tools, robotics, products to learn coding and even computers and tablets. In fact, Eduporium has offered Share it! Science readers an exclusive discount code. Use the code SHAREITSCIENCE now through May 31st, 2017 to receive 10% off of your ed tech order!

Interested in learning more about Eduporium? Check out their site, read their blog, follow them on social media, or visit their YouTube page!

Ed Tech Giveaway!


Enter to win a Tech Will Save Us DIY Speaker Kit plus a special $50 shop credit at Eduporium.com! This kit is a super fun way to teach kids about sound, amplification, and learn basic electronic and soldering skills while building their own speaker. This giveaway runs from December 8th, 2016 until midnight (EST) December 14th, 2016. You must be a resident of the United States to enter. Enter by following the directions in the Rafflecopter box below. The winner will be announced on this page and across our social media platforms.

a Rafflecopter giveaway
All images and giveaway items provided by Eduporium.com