Share it! Science : seeds
Showing posts with label seeds. Show all posts

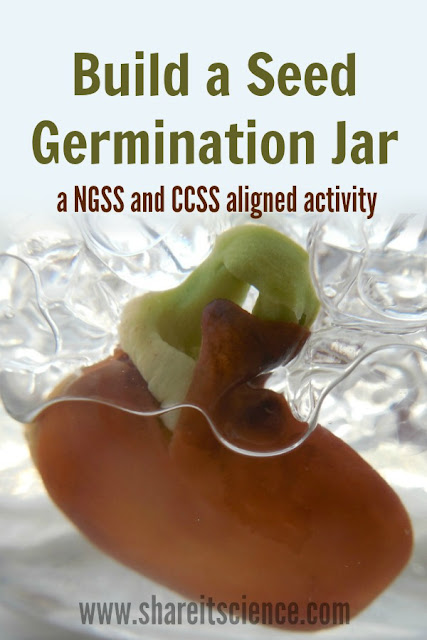
DIY Seed Germination Jar: A Must-Have for Your Plant Unit!

Seed germination is one of nature's little wonders. Giving your kids and students the opportunity to grow a plant of their own can be a magical experience. Unfortunately, we most often stick the seeds in some soil where we cannot see what happens as the seed becomes a tiny sprout. You can easily solve this problem by building a germination jar so that kids can see the entire process in action!

Building the germination jar is easy, and it is the perfect addition to your plant unit at school or in your home-school. This inquiry-based science activity is linked to K-2 Next Generation Science Standards and offers an extension idea to align with Common Core English and Language Arts standards as well. Paired with a wonderful children's book, you'll definitely want to add this to your spring to-do list for school or home!
Elementary School Seed Plant Science Experiment


This post contains affiliate links, meaning I will receive a small commission (at no additional cost to you) if you make a purchase after clicking a product link. Please see disclosures page for more details.
 

Growing "One Bean"


There are so many science lessons and life lessons learned when children grow something themselves. You can make this activity a part of a science unit on life cycles or just an introduction to gardening with children.

First, we read One Bean, a sweet picture book by Anne Rockwell. In this story a boy plants a bean seed and watches it grow. Although told in a narrative style, anyone could follow the process of growing a bean seed themselves along with the story.


The boy puts the bean in a damp paper towel to prepare it for planting. Once it is wrinkled, he plants it in some soil and waits for his seed to sprout. This is where most planting projects become mysterious! The beauty of your germination jar is that you'll be able to watch the process unfold.
Fava Bean Germination Science Experiment NGSS Aligned

Build a Germination Jar 


To build your seed viewer, or germination jar, you'll only need a few supplies:
Water beads are pretty amazing! You only need a few at a time, and you can dry them out and reuse them for other projects.(They would be great to study absorption as well, as they soak up that water and grow to be 100's of times their original size.)

There are many ways to germinate a seed by keeping it moist, including wrapping in a damp paper towel like in the bean story we read. However, I like that by using the water beads, you do not have to cover the top of the jar up with plastic wrap or something else to hold the moisture in. I have used that method many times to teach children about plants. It works, but it can also lead to mold growing because it sometimes stays too wet.
Build a Seed Germination Jar for Science Experiments

You will have to experiment with how many water beads and how much water to use. The jar we began with ended up being far too large, so eventually we moved our experiment to a smaller glass. Start by using just a few water beads- a tablespoon of them can go a long way. Pour a bit of water on and let them absorb it for a couple of hours before adding anything else.

You want your jar to be moist, but not too wet. You will need enough water beads to hold your seed in place, but not so many that there is no room to grow. This is the experiment within the experiment!


Watch a Seed Germinate


Before you start, soak your bean seed(s) in a glass of water over night. This really helps to get them off to a quick start. We chose fava beans because they are easy for small hands to hold and are large so you can really see what is going on with them.

Once you've soaked your seed and prepared your water beads, place the bean seed so that it is close to the side of the glass and easy to view. Be sure that there are water beads over the top of the seed so that it stays moist.

Watch a seed germinate, great activity for plant unit

Then, you wait! Until the seed begins to germinate, you might want to give the jar a little more water each day, carefully pouring it around the outside of the jar where the seeds are. Within a day or so, you should begin to see that first part of the sprout, the radicle, emerging from the seed.

Keep an eye on your jar. If your water beads seem to be shrinking, add just a bit more water. Once you have a green sprout, you can choose whether to leave the seed in the water beads, or plant it in some soil. If you plan on trying to keep your plant growing to maturity, I'd suggest planting it before too long.
Watch a seed germinate! Plant science experiment

If you are lucky enough to have garden space, then that is the obvious place to grow your beans, but for those with space at a premium, particularly schools, I would suggest investigating growing a pocket garden on a wall. Here is one example of a pocket planter.
 

Meet Common Core and Next Generation Science Standards


This seed investigation will work towards meeting these Next Generation Science Standards for K-2.
NGSS K-LS1-1
NGSS K-ESS3-1
NGSS 2-LS4-1

You can also work towards these K-2 Common Core English and Language Arts Standards by creating an observation journal that includes words as well as drawings.
CCSS.ELA-Literacy.W.K.3
CCSS.ELA-Literacy.W.1.3
CCSS.ELA-Literacy.W.2.3

More Plant Science Investigations! 


Learning with plants can continue throughout the spring and summer seasons. It is a great way to investigate biology concepts like pollination with elementary students.

One of my favorite experimental plant projects is growing an avocado plant from its pit.

Grow an Alphabet Themed Kids Garden

Try growing a themed garden with kids. Some theme ideas are: an alphabet garden, a rainbow garden, a taco garden, or a pizza garden, or a garden friends companion garden. 

Explore math and science with sunflowers, and learn the parts of the flower with students in preschool all the way through High School by doing a flower dissection

Storybook Science Series


This activity is part of the Storybook Science series. You can find more great book-linked science activities in this series on the Inspiration Laboratories blog.  

http://inspirationlaboratories.com/storybook-science-3/

You'll also want to visit my Storybook Science posts from past years:

The Dandelion Seed: Design A Seed Engineering Challenge

Floating, flying, hitchhiking...plant seeds have many adaptations for survival. Challenge your kids or students to design their own seeds. What adaptations for survival do your seeds have? 

This is a great opportunity to learn the engineering process. Explore plant adaptations and life cycles. Observe the variety found in real plant seeds. So many possibilities here for science and engineering!

Design a Seed Engineering Challenge (www.shareitscience.com)

This post contains affiliate links, meaning that I receive a small commission for purchases made after clicking these links, at no additional cost to you. Please see disclosures for more information.

Amazing Plant Seeds


I love seeds! All the different shapes, the variety, the adaptations for survival, they are all pretty amazing. When learning about seeds with kids, one of my favorite picture books to read is the beautifully illustrated story, The Dandelion Seed, by Joseph Anthony and illustrated by Cris Arbo.


The story follows a hesitant dandelion seed as it floats away from its plant in the fall. Throughout its adventure it passes through the 4 seasons, by cities and countryside until eventually it comes full circle and grows into a dandelion plant. This plant makes seeds as well that head off on their own adventures on the last page.

The book is a great entry point to many science topics including plant life cycles, seasonal changes and plant adaptations. The topic of plant adaptations leads us to a fun engineering challenge: design a seed! Some seeds fly in the air, some float in the water. Some stick to the fur of animals, our socks and pants to get from one place to another. Some even must be digested before they can grow!

https://bookshop.org/shop/shareitscience

Seed Engineering Design Challenge


The engineering challenge will be to design three different seeds and test out their abilities. You'll design one that is meant to fly in the breeze, one that will float in water, and another that will stick to something fuzzy.

You can use any household materials for your design challenge. I suggest items such as: scrap paper, box board (cereal boxes, cracker boxes etc.) drinking straws, string, 3x5 index cards, rubberbands, paperclips and scissors. To make it more of a challenge do not include tape, glue or velcro in your supplies.
©SBF 2016

Although most seeds are fairly small, your designs can be as big as you'd like, as long as they float, fly and stick you've accomplished your goal!

Once you've created a seed that you think will fly, test it out! If it is a dry day you can take your seed outside, or (keeping safety in mind) drop it out an upstairs window. You can also set up a fan and test it indoors. (Please watch out for little fingers!)

Flying seeds ©SBF 2016
Flying seeds?! ©SBF 2016

How did your seed do? Do you need to redesign and try again?

You can test your floating seed in the sink, a basin or the bathtub.

Floating seed designs. ©SBF 2016
Testing floating seeds. ©SBF 2016
Find a fuzzy blanket, fleece jacket, or patient pet to test your sticky seed out. How well do they work? It is okay to tweak your design, that is what professional engineers do!

Sticky seed designs ©SBF 2016
Sticky seed designs. ©SBF 2016

Testing sticky seeds on a fuzzy blanket. ©SBF 2016

Picture Books for Studying Plant Seeds


Once you are finished, you might want to learn more about seed adaptations. What different shapes do seeds come in? Can you find any that look like the seeds you created? I suggest picking up a copy of Flip, Float, Fly: Seeds on the Move by JoAnn Early Macken, illustrated by Pam Paparone. This colorful story with fun text describes how many different types of seeds travel, with an example of each. Who knows, maybe it will inspire a new seed design challenge?


Another excellent non-fiction picture book is How and Why? Seeds Travel by Elaine Pascoe with photographs by Dwight Kuhn. This book has great close-up photography of seeds on the move and their growth and development. It wraps up with some additional learning activities to try.


If you enjoyed The Dandelion Seed, you'll also like the Joseph Anthony's second story about dandelion seeds, The Dandelion Seed's Big Dream. This one follows a seeds plight through some tough conditions before its dream comes true, to grow into a flower. Some science ideas here are persistence in nature, plant adaptations and life cycles. There is also a nice section in the back of the book with some scientific information about dandelion plants.


If you love books and science, then you definitely will enjoy the Storybook Science series at Inspiration Laboratories! 

Storybook Science


Saturday Science Experiment: Grow an Avocado!

We love avocado in our house. Do you? Do you ever wonder about the avocado pit, or seed, inside? Most likely it is simply the thing you discard along with the thick bumpy outer peel. Did you know you can grow an avocado from this seed? Yes, yes you can, would I lie to you?

We have tried this experiment many times. Sometimes it is successful, and other times it is not. This is science after all! If you are successful you can grow yourself a lovely houseplant. It is an awesome science project because you can see seed germination, a process that is normally under the soil, happen right before your eyes.

avocado pit experiment hands-on learning about plant seeds


grow an avocado experiment
Avocados (photo by Ms. Tea, Flickr)
Recently I was cutting an avocado and I couldn't slice into it very far. I was puzzled until I opened it up and found one of the largest avocado pits I have seen. The inside was more pit than avocado! Unfortunately I did not photo document this moment in history, so you'll just have to take my word for it. However, it did inspire me to try this experiment.

avocado pit experiment
The enormous avocado pit (right) and a relatively small one (left). ©SBF 2015


This post contains affiliate links, meaning I will receive a small commission (at no additional cost to you) if you make a purchase after clicking a product link. Please see disclosures page for more details.

Grow Your Own Avocado Plant!

In order to try to germinate this seed you have to submerge the bottom part of it in water. An alternative, as described in the book, Don't Throw it, Grow it! is to germinate the pit in a bag of sphagnum moss. As I was fresh out of sphagnum, the water method had to do!

 
All you need to do is stick 3-4 toothpicks into the bottom half of the pit to hold it up in a glass of water. Which side is the bottom? If your pit has a point on one side, that is the top. If it is round, like my big avocado pit was, you'll have to pay attention to which end came from the same side as the stem on the actual avocado. This side is the top.

avocado pit submerged in water grow experiment
©SBF 2015


Place the pit in the water, resting the toothpicks on the glass. Keep the water level high so that the bottom of the avocado stays submerged and watch what happens. The beauty of this experiment is that you can see all of the process through the glass. If you don't see the pit begin to split and roots forming after several weeks, try a different avocado pit. 


Here is an avocado plant that we grew from a pit we found germinating in the compost bin. The large seed was split and roots were growing out of it. Due to my plant obsession, I quickly potted it and a few months later we have a nice new houseplant. As fun as it would be to harvest our own avocados, this plant will always just be for decoration. Without being in a hot natural climate it will never produce fruit.

avocado houseplant grown from avocado pit
Avocado houseplant ©SBF 2015

Avocado houseplant grown from avocado pit
Avocado houseplant ©SBF 2015

Growing Plants from Food Scraps and Seeds

I enjoy seeing the plants you can grow from the seeds that you find in your food. If this sounds like a fun idea to you, you might want to check out my posts, "Saturday Science Experiment: Grow a Plant from Food Scraps"  and "See it? Share it! A Grapefruit Sprout and an Indoor Flower Garden"


Last winter I grew a grapefruit plant. Although my grapefruit sprout those old blog posts has indeed grown into a little plant, it is not very tall. It does have nice shiny leaves though!

grapefruit plant grown from a fruit seed
Grapefruit Plant ©SBF 2015
grapefruit plant grown from fruit seed
Tiny grapefruit plant! ©SBF 2015
 
To grow more types of houseplants from food scraps and seeds you'll definitely want to check out "Don't Throw it, Grow it!" by Deborah Peterson and Millicent Selsam. There are ideas for 68 different houseplants from dates to beans, chickpeas and kiwi!

Other Plant and Seed Learning Resources

If you are fascinated by seeds or are teaching a plant unit, you might be interested in this lesson: Seed Size from the Lawrence Hall of Science. You need an avocado pit to do it!

You'll also find a ton of fascinating blog posts about seeds in Growing With Science's series "Seed of the Week".


It's Raining Acorns!

    
     It seems like this year is a good one for the oaks. The past few days I have literally heard acorns raining down in the forest around my yard, and they are littering walkways and sidewalks everywhere. I am sure many in my neck of the woods remember the exceptionally big "mast" year for acorns- 2010. That year it was a painful proposition to take a walk under an oak tree, they rained down for days. Mast is the word used for the reproductive part of woody plants, in other words, the seeds of trees and shrubs. There are soft masts and hard masts. Soft masts include tree buds, catkins and berries, whereas hard masts-you guessed it- are harder "fruits" such as acorns, hickory nuts and beech nuts. In some seasons there are more hard masts, like acorns, produced than others. It is a phenomena that scientists have difficulty predicting with great certainty, although there can be some predictable factors such as weather. Like all things in nature there are so many causes and interconnections that predicting a good mast crop year is a little tricky. These abundant years could happen two years in a row, or may have two to five years in-between. Weather may be a factor, however, since most acorns or nuts are on a two-year growth cycle, the weather that is advantageous for producing a larger quantity of seeds may occur in the year before we notice the seed production.
     As you can imagine, more acorns means good eating for herbivores such as chipmunks, squirrels, turkey and deer. Squirrels not only have a lot to eat, but they also help the tree to disperse its seeds. Gray squirrels bury their acorns in a variety of different places and then only recover some. These forgotten seeds often grow into saplings. In essence they are planting the seeds for the oaks.
Gray squirrels are smarter than you might think when it comes to acorns. Scientists have found that the squirrels can differentiate the acorns from white oaks and the acorns from red oaks. The white oak seeds germinate very quickly, and therefore lose their nutritional value hastily. The squirrels eat these first, rather than store them for later. They prefer to store the red oak acorns to eat over the winter and spring. Even more incredibly, sometimes the squirrels will bite through the embryo of the white oak acorns, prohibiting them from sprouting. This makes the white oak acorns just as valuable to store as the red. The wonders of nature never cease to amaze- if only they could evolve the behavior to look both ways before crossing the road!
     Obviously, there are pros and cons for many natural phenomena, depending on your species and perspective. Scientists have linked larger Lyme disease carrying tick populations to years with small acorn crops. A good mast year in the northeast can lead to a boom in the population of white-footed mice, whereas a meager crop causes a big drop in the mouse population. White-footed mice are the preferred host for the black-footed tick which is very good at carrying and transmitting Lyme disease. When the population drops, the ticks are forced to find other hosts- including us. This was very clear after the huge mast crop in 2010. The mouse population sky-rocketed, then the following year the acorn crop was practically non-existent. The subsequent mouse population crash caused the potential for an influx of Lyme disease that year. Many believe that the tick population has only to do with the weather, but again, there are many factors at work in the complex natural world.
     Regardless of the larger food web implications of raining acorns, it's probably best to duck and cover this fall if you venture out under the oak trees- they come down pretty fast!

Read more:


Tree Activities and Resources

Mast Tree Network

Arbor Day Tree ID online field guide

Arbor Day Tree ID lesson plan (grades 4-12)

Project BudBurst- Citizen Science Project

Acorn Craft Ideas

Acorn Science Story for kids- Highlights magazine