Share it! Science : "Saturday Science Experiment"
Showing posts with label "Saturday Science Experiment". Show all posts

Saturday Science Experiment: Grow an Avocado!

We love avocado in our house. Do you? Do you ever wonder about the avocado pit, or seed, inside? Most likely it is simply the thing you discard along with the thick bumpy outer peel. Did you know you can grow an avocado from this seed? Yes, yes you can, would I lie to you?

We have tried this experiment many times. Sometimes it is successful, and other times it is not. This is science after all! If you are successful you can grow yourself a lovely houseplant. It is an awesome science project because you can see seed germination, a process that is normally under the soil, happen right before your eyes.

avocado pit experiment hands-on learning about plant seeds


grow an avocado experiment
Avocados (photo by Ms. Tea, Flickr)
Recently I was cutting an avocado and I couldn't slice into it very far. I was puzzled until I opened it up and found one of the largest avocado pits I have seen. The inside was more pit than avocado! Unfortunately I did not photo document this moment in history, so you'll just have to take my word for it. However, it did inspire me to try this experiment.

avocado pit experiment
The enormous avocado pit (right) and a relatively small one (left). ©SBF 2015


This post contains affiliate links, meaning I will receive a small commission (at no additional cost to you) if you make a purchase after clicking a product link. Please see disclosures page for more details.

Grow Your Own Avocado Plant!

In order to try to germinate this seed you have to submerge the bottom part of it in water. An alternative, as described in the book, Don't Throw it, Grow it! is to germinate the pit in a bag of sphagnum moss. As I was fresh out of sphagnum, the water method had to do!

 
All you need to do is stick 3-4 toothpicks into the bottom half of the pit to hold it up in a glass of water. Which side is the bottom? If your pit has a point on one side, that is the top. If it is round, like my big avocado pit was, you'll have to pay attention to which end came from the same side as the stem on the actual avocado. This side is the top.

avocado pit submerged in water grow experiment
©SBF 2015


Place the pit in the water, resting the toothpicks on the glass. Keep the water level high so that the bottom of the avocado stays submerged and watch what happens. The beauty of this experiment is that you can see all of the process through the glass. If you don't see the pit begin to split and roots forming after several weeks, try a different avocado pit. 


Here is an avocado plant that we grew from a pit we found germinating in the compost bin. The large seed was split and roots were growing out of it. Due to my plant obsession, I quickly potted it and a few months later we have a nice new houseplant. As fun as it would be to harvest our own avocados, this plant will always just be for decoration. Without being in a hot natural climate it will never produce fruit.

avocado houseplant grown from avocado pit
Avocado houseplant ©SBF 2015

Avocado houseplant grown from avocado pit
Avocado houseplant ©SBF 2015

Growing Plants from Food Scraps and Seeds

I enjoy seeing the plants you can grow from the seeds that you find in your food. If this sounds like a fun idea to you, you might want to check out my posts, "Saturday Science Experiment: Grow a Plant from Food Scraps"  and "See it? Share it! A Grapefruit Sprout and an Indoor Flower Garden"


Last winter I grew a grapefruit plant. Although my grapefruit sprout those old blog posts has indeed grown into a little plant, it is not very tall. It does have nice shiny leaves though!

grapefruit plant grown from a fruit seed
Grapefruit Plant ©SBF 2015
grapefruit plant grown from fruit seed
Tiny grapefruit plant! ©SBF 2015
 
To grow more types of houseplants from food scraps and seeds you'll definitely want to check out "Don't Throw it, Grow it!" by Deborah Peterson and Millicent Selsam. There are ideas for 68 different houseplants from dates to beans, chickpeas and kiwi!

Other Plant and Seed Learning Resources

If you are fascinated by seeds or are teaching a plant unit, you might be interested in this lesson: Seed Size from the Lawrence Hall of Science. You need an avocado pit to do it!

You'll also find a ton of fascinating blog posts about seeds in Growing With Science's series "Seed of the Week".


Testing a Product with the Scientific Method: Mabel's Labels

scientific method
Have you ever wondered if a product was all it claimed to be? Is the quality worth the price? We don't always have the luxury of testing products before we buy them, but designing an experiment to test a product is a great way for children to practice using the Scientific Method.

I have had many students complete independent science projects that involve testing a product, from the effectiveness of different toothpastes to name brand groceries versus generic. It is a wonderful way to use science skills to explore a real-world idea.

science experiment label
©SBF

Mabel's Labels provided the labels for this experiment, however this post was not otherwise sponsored by Mabel's Labels, and all ideas are those of the author. This post contains affiliate links. Please see disclosures tab at the top of page for further details. 

We wanted to test our new Share it! Science labels from Mabel's Labels. So we devised an experiment.

Testable Question
Every good science experiment should begin with a testable question. "Will the pumpkin sink or float?" is an example of a testable question. "How do birds fly?" is not a testable question.

Our testable question for our label experiment was: "Will the label fall off or stay sticky after several trips through the dishwasher?" and a secondary question "Will a label on a water bottle fade or stay bright after spending a month in and out of a backpack?"

Developing a Hypothesis
Before any experiment, it is important to consider a hypothesis. This is an educated prediction. Often students, particularly younger ones are tempted to change their hypothesis to meet their actual results after they have completed an investigation. It is ok if your hypothesis ends up being incorrect! The best science experiments lead to new questions!

Our hypotheses for our Mabel's Labels experiment were: "Labels will begin to peel after 3 trips through the dishwasher." and "The label on the water bottle will fade from being scratched in the backpack." 
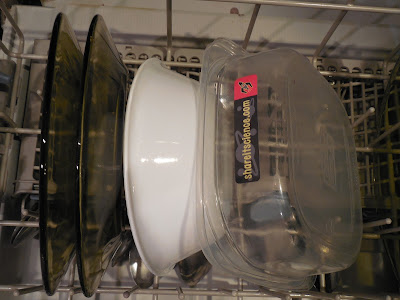
science experiment in dishwasher
©SBF
Methods
Before an experiment, it is important to plan how you will complete it. A good experiment is something that can be repeated by another person to get similar results.

Our methods:

Dishwasher Experiment
1. Put a label on a plastic food container
2. Take a photo of the label
3. Place food container in dishwasher
4. Run dishwasher on "Adaptive Wash" cycle
5. Take a photo and observe changes
6. Repeat steps 3-5 four times

Water Bottle Experiment
1. Put labels on 2 different water bottles
2. Take a photo of each label
3. Use water bottles normally (to school and sports practice)
4. Once a week, take a photo and observe changes
5. Repeat steps 3-4 for one month

Experiment and Make Observations
There are qualitative observations and quantitative observations. Qualitative observations describe the physical qualities of something, i.e. the leaf is red. Quantitative observations describe measurable qualities, i.e. the leaf has 3 points.

Quantitative observations are easier to analyze in a graph or table. They are not as subjective as qualitative observations. You can create a scale to measure qualitative observations in a quantitative way. This is what we did for our experiment.

Observation # 1= No change 2= Color faded slightly 3= Color faded slightly, and/or visible scratch or dent, and/or wear or peeling beginning on corners 4= Color faded more significantly, and/or 2-3 scratches or dents, and/or peeling beginning in multiple places 5= Color faded almost completely, and/or more than 3 scratches or dents, and/or significant peeling


Results
Your results should accurately describe the observations in the experiment. Here are our data tables and photos:
Label science experiment


Dishwasher
Observation # 1= No change 2= Color faded slightly 3= Color faded slightly, and/or visible scratch or dent, and/or wear or peeling beginning on corners 4= Color faded more significantly, and/or 2-3 scratches or dents, and/or peeling beginning in multiple places 5= Color faded almost completely, and/or more than 3 scratches or dents, and/or significant peeling
1 1


2 1


3 1


4 1


label scientific method science experiment

Water Bottle- #1 White
Observation # 1= No change 2= Color faded slightly 3= Color faded slightly, and/or visible scratch or dent, and/or wear or peeling beginning on corners 4= Color faded more significantly, and/or 2-3 scratches or dents, and/or peeling beginning in multiple places 5= Color faded almost completely, and/or more than 3 scratches or dents, and/or significant peeling
Week 1 1- no change


Week 2


3- one small scratch


Week 3


3- same


Week 4


4- two small scratches


water bottle science experiment

Water Bottle- #2 Opaque
Observation # 1= No change 2= Color faded slightly 3= Color faded slightly, and/or visible scratch or dent, and/or wear or peeling beginning on corners 4= Color faded more significantly, and/or 2-3 scratches or dents, and/or peeling beginning in multiple places 5= Color faded almost completely, and/or more than 3 scratches or dents, and/or significant peeling
Week 1 1- no change


Week 2 1- no change


Week 3


3- one small scratch


Week 4


3- same


Our data could also be made into a graph for analysis.


Conclusions
We found that neither of our hypotheses were correct. After 4 trips through the dishwasher we saw no perceivable changes to the label. Despite normal wear and tear we only saw some small scratches on the labels on the water bottles. Their colors did not fade. Although we were incorrect, we were happy to see the quality of the labels!

It is important to consider the variables and conditions of the experiment when analyzing results. Here are things we might change and some new questions to consider before doing the experiment again, in order to be more accurate.
  • We would assure that the container was in the same position in the dishwasher during each wash cycle. We need to take into account the make-up of the dishwasher. How can we control for the level of food or grease that is in the water?
  • We would repeat the dishwasher experiment many more times.
  • How do we control for conditions with the water bottle experiment? Each day is different. (Maybe specific controllable tests.)
  • We would observe the water bottles for a longer period of time. 
  • Control lighting and resolution of photos for more accurate data
It is ok for an experiment to result in further questions! In fact, most experiments do!

We can conclude from our results that Mabel's Labels really hold up to daily life! I would definitely purchase them again. What sort of product testing could you introduce to your children or students to help them practice the scientific method?

The Stocking Stuffer Combo

Happy 1st Birthday "Share it! Science"!


Today marks 1 full year of "Share it! Science News". Let's celebrate this milestone with some birthday science! Whether you are hosting a science themed birthday party, or are just looking for a fun science activity this is a great place to start.

Balloons!
One of my all time favorite balloon activities to do with any age is to make "Balloon Rockets".

You will need:
  • a balloon
  • scotch tape
  • drinking straw
  • string
What you need to do:
Slide the straw onto your string. If it is a flexible straw, cut off the bend part first. 

Place the straw on the string. ©SBF 2015

Tie or tape your string taut across the room or an area outside.

©SBF 2015

Blow up your balloon, but do not tie the end. Scotch tape one side of the balloon to the straw. 

©SBF 2015

Be sure the straw and balloon are at one end of the string. Countdown to rocket launch...5, 4, 3, 2, 1...LIFT OFF! Release the balloon and see what happens. 

©SBF 2015

Further questions:
  • What will happen if I blow more air into the balloon?
  • How far can I make the balloon travel?
  • What happens if I only blow the balloon up halfway?
  • Can I predict exactly where the balloon might stop?
  • How does the balloon travel if I do not tape it to the straw and then let it go?

The science: What makes the balloon rocket fly?
This experiment demonstrates Newton's Third Law: For every action, there is an equal and opposite reaction. When I blow up my balloon I am filling it up with gas. Gas is an excited state of matter. The molecules of gas in the balloon are bouncing around and colliding with one another. As I blow more gas into the balloons these little collisions increase. All this activity is putting pressure on the balloon. Eventually the pressure inside the balloon is greater than the air pressure surrounding the outside of the balloon. When I let go of the balloon the gas rushes out in order to balance our equalize the pressure inside and outside the balloon. The air rushing out causes a force on the balloon and propels it forward, creating the balloon rocket.


Candles!
Who doesn't love blowing out birthday candles? With adult supervision, this is a fun experiment to try. It might also inspire your party's decorations!

Heat spirals
You will need:
  • an adult
  • a paper plate, or circular piece of paper
  • thread
  • candle
  • clay or a candle holder (if you do not have a birthday cake!)
  • matches or a lighter
What you need to do:
Cut your plate or circular piece of paper into a spiral. 

©SBF 2015

Tie one end of it with the thread above the table where you will have your candle, (or cake) set up. 

©SBF 2015
Be sure the end of the spiral will not be touching the flame of the candle. Light the candle and observe. What happens? 

©SBF 2015

Further questions:
  • Can you put several spirals above a birthday cake full of candles?
  • Can the heat from the candle make other shapes move?
  • If I tie the spiral higher above the candle will it still spin?
  • How fast can I make it spin?
The science: What makes the paper spin?
This is an example of convection. Convection is one type of heat transfer. You've probably heard the term "heat rises". As the candle heats the air above it the air begins to rise because the warm air is less dense than cool air. The cool air begins to sink. This motion is called a convection current. The moving air puts pressure on the underside of the paper spiral and that is why it begins to spin.

Do you want to throw a science themed birthday party? 
Here are some other fun ideas:
(affiliate link)

Science Experiment: The Hidden Colors in a Leaf

The other day I was out in my yard and noticed something brilliantly red in contrast to the green grass. I couldn't believe it, a tree was already beginning to change color and drop its leaves! I love fall, but I don't know if I am quite ready to leave summer behind. Although it did get me thinking about the colors in leaves and how this was a great opportunity for science!

Here is a great experiment for any time of year that illustrates why leaves change color in the fall in colder climates. Try this experiment as a demonstration for young students, or  as a hands-on project for elementary or middle school.

Leaf Pigment Science Experiment

This post contains affiliate links, meaning I receive a small commission from purchases made through these links. Please see disclosures for more information. As well as links from Amazon.com you will find links to Bookshop.org, an online book store that works to support local independent book stores. Shopping through Bookshop links not only supports this website, but can help you support book stores in your area! 

Why Do Leaves Change Color in the Fall? 

 
Why do some tree's leaves turn different colors in the fall? This beautiful act of nature has to do with the pigments in leaves. You are probably already familiar with one of the pigments- chlorophyll. Chlorophyll is the pigment that makes plants green. It is very important in photosynthesis, the process by which plants make their own food, as it allows plants to absorb the energy in light.

Although green is the color we associate with most plant leaves, there are other pigments in plants. Carotenoids are orange and yellow pigments that are in leaves all year round. During the growing season these pigments are masked by the green chlorophyll. As the tree begins to "shut itself down" or go dormant for the winter, it is not making chlorophyll any longer and the other colors begin to shine through.

Leaf Pigment Science Experiment

Anthocyanins are pigments that are not present all year in the leaf, but are produced there as the summer comes to an end. These pigments are responsible for the reds and purples we see in fall foliage.

How can we find out what colors are in a leaf? Chromatography! Chromatography is the process of separating mixtures, in this case colored pigments. Here is a kid-friendly version of leaf chromatography appropriate for home or school. 


Leaf Science Experiment Supplies


Hidden Colors in a Leaf Pigment Science Experiment

You will need:

Leaf Chromatography Experiment


Collect a variety of leaves. I chose different colors just to see what would happen. My hypothesis was that I would see the most variation of pigments in the green tree leaves, like the maple and beech.
Hidden Colors in a Leaf Pigment Science Experiment

Grind up the leaves. This is the fun part! You can crunch, tear and grind them up with your fingers, or grind them with a little bit of water in a mortar and pestle. Kids love using the mortar and pestle and you can get them fairly inexpensively.

Hidden Colors in a Leaf Pigment Science Experiment


Put the leaves (and any liquid if you've used the mortar and pestle) into your beaker or glass. Add about 2 Tablespoons water and 2 teaspoons isopropyl alcohol in the glass. (Alternative examples of this experiment omit the water and call for heating the alcohol and then covering the glasses with plastic wrap to prevent evaporation. I have done it without heat and plastic wrap many times and it seems to work fine!)
Hidden Colors in a Leaf Pigment Science ExperimentHidden Colors in a Leaf Pigment Science Experiment
Cut the coffee filters into strips. The middle of the filter works the best as it is the widest, but any strip will work. Roll one end of the strip around a pencil. Adjust the height so that when you place it in the liquid it is just barely touching. Secure it with a small piece of tape.
Hidden Colors in a Leaf Pigment Science Experiment

Hidden Colors in a Leaf Pigment Science Experiment
Put your strip in the leaf mixture and let it sit overnight. The next day pull the strips out and let them dry. Then observe! What do you notice? Look carefully, there will be tiny stripes of different colors. The most water soluble pigments will travel the furthest. What pigments do you see in each leaf? Are you surprised by the results? Why?
Hidden Colors in a Leaf Pigment Science Experiment
Some really pretty pigments in the Japanese Maple Leaf (L), and mostly browns in the red Maple leaves (R).

Hidden Colors in a Leaf Pigment Science Experiment
Notice the thin line of green pigment (Chlorophyll!) on the bottom of the Beech leaf (L) and the Grass (R).
I am excited to compare these end of summer results with the same leaf types in the spring! Do you predict there will be a difference?

For the entire experiment lesson plan including student sheets, click here

Have fun experimenting! I'd love to hear about your results!

If you are interested in plant STEM, you'll also like to try this seed engineering design challenge.  Also check out this collection of autumn science activities.


Tons of great plant science activities on my Pinterest Board!


Hidden Colors in a Leaf Pigment Science Experiment


Saturday Science Experiment: Spies and CSIs

     
Looking for a weekend project? Here are three activities that little spies and detectives can do with regular household items. Write secret messages and reveal them easily- no lemon juice or open flames! Then create a fingerprint database of the members of your household with very little mess.

This post contains affiliate links, please see disclosures for more information. 


Spy project #1: Invisible messages with wax and watercolors

Supplies: scrap paper, white crayons, watercolors, paintbrush, an optional smock

Procedure: On a piece of paper, draw a secret message or picture with the white crayon. To reveal the message, paint over it with watercolor paint. Voila! 

The science: The wax from the crayon creates a barrier that keeps the paint from adhering to that part of the paper. In art this is a method called wax resist. You may have used this technique to create designs on dyed Easter eggs. 

© SBF


Spy project #2: Invisible ink with baking soda and juice

Supplies: scrap paper, baking soda, water, dark colored juice (we used grape), paintbrush, small sponge or cotton swabs, an optional smock

Procedure: Mix up the water and baking soda in a 1:1 ratio. Mine was 2 Tbl water and 2 Tbl baking soda. Mix well, then using a paintbrush, paint your secret message on a paper. Let the paper dry completely. To reveal the secret message, dip a cotton swap or a sponge in the dark colored juice (we used grape, but cranberry would also be a good option) then gently "paint" a generous amount onto your message. It will reappear! Note, this is one of those "self-destructing" messages, once it dries, your message won't be very clear anymore.

The science: There are pigments in the juice called anthocyanins. These give the juice its color and react with the baking soda. Anthocyanins work as a pH indicator, just like a piece of litmus or pH paper. pH is the scale of acids and bases. Since baking soda is a base, the pigments react and change color, hence your message is revealed! A similar pH experiment can be found in my post: "Saturday Science Experiment: Science with Christmas Leftovers" 


©SBF


Crime Scene Investigator Project: Fingerprint database

Supplies: pencil, pencil sharpener, scrap paper, scotch tape, your fingers
©SBF

Procedure: Using a freshly sharpened pencil, color a dark splotch on a piece of scrap paper. Rub your finger on the pencil splotch. Using a piece of tape, "lift" the print off of your finger. Place it on your database sheet. You can create a fingerprint database for the whole household!

The science: As we all know, everyone's fingerprint patterns are different. The skin on the fingertips is ridged, which creates a specific pattern that can be left behind on certain surfaces. There are three main types of fingerprint patterns- loops, whorls and arches. Once you have created your database, you can compare the prints for these patterns. Learn more about these patterns in depth here.

©SBF

Did you try any of these activities? Share your experience by commenting below, or e-mailing me at shareitscience@gmail.com

Are you looking for other easy at-home science projects? Check out my "Saturday Science Experiment" page. You'll also find some great quick science experiments for kids here. Happy Experimenting!


http://www.shareitscience.com/2016/01/best-kids-activities-of-2015.html